MILS stands for Modular Integrated Landscaping System. It is a community-developed standard for building LEGO baseplates that connect to each other using a uniform system of Technic pin connections along the edges. The concept is straightforward: if every builder uses the same connection points at the same positions on their baseplates, then any two MILS-compatible plates can lock together side by side, creating seamless, expandable display layouts.
The system was developed by the LEGO fan community to solve a specific problem. When builders bring their MOCs to conventions and exhibitions, they need individual builds to connect into a cohesive display. Without a standard, every builder uses a different baseplate size, different edge treatment, and different connection method. The result is a collection of beautiful builds that look awkward sitting next to each other with visible gaps, misaligned surfaces, and no structural connection. MILS eliminates that problem entirely.
But MILS is not just for conventions. If you build multiple MOCs for home display and want them to connect into a unified scene - a city block, a racing paddock, a landscape - MILS gives you the framework to do it. Build each MOC on a MILS-compatible base, and they all connect. Rearrange them any time. Add new plates as your collection grows. The modularity means your display layout is never permanent and never finished.
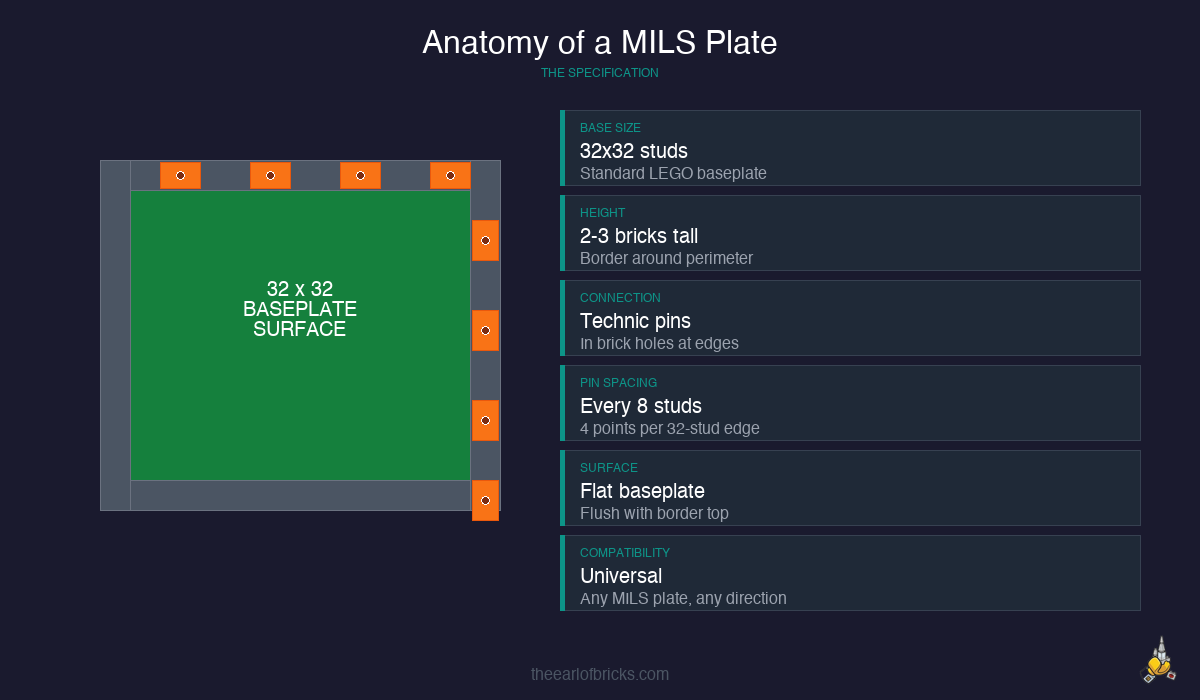
The standard MILS plate starts with a 32×32 stud baseplate - the classic green, gray, or tan baseplate that LEGO has produced for decades. Around the perimeter, you build a border of bricks, typically two to three bricks high, that serves two purposes. First, it gives the plate structural rigidity. A bare baseplate flexes and warps. A baseplate with a brick border becomes a solid, flat surface. Second, the border bricks contain Technic holes at standardized positions where Technic pins or half-pins insert to connect adjacent plates.
The connection system is elegant in its simplicity. Technic bricks - standard 1×2, 1×4, or 1×6 bricks with round holes through them - are built into the border at specific intervals. When two MILS plates sit side by side, the Technic holes in their adjacent borders align perfectly. You push a Technic pin or half-pin through both holes, and the plates lock together. No glue. No rubber bands. No friction-fit hoping. A mechanical, positive connection that holds firmly but releases cleanly when you want to rearrange.
The pin positions follow a standard that the community has settled on over years of iteration. The most common specification places connection points at the corners and at regular intervals - typically every 8 studs - along each edge. This means a 32-stud edge will have connection points at positions 4, 12, 20, and 28 (or similar spacing depending on which variant of the MILS spec you follow). The key is consistency: as long as all your plates use the same spacing, they will all connect to each other.
Start with a 32×32 baseplate. Gray is the most versatile color for display purposes, but green works for landscape scenes and tan works for desert or beach environments. The baseplate color becomes the surface color of your finished plate, so choose based on your display needs.
Build the border. Along all four edges of the baseplate, construct a border wall two bricks high using a combination of standard bricks and Technic bricks. The bottom layer should include Technic bricks at your chosen connection intervals. A common approach is to use 1×4 Technic bricks at positions 4, 12, 20, and 28 studs along each 32-stud edge, with standard bricks filling the gaps between them. The second layer is standard bricks only, capping the Technic bricks below and providing a finished top edge.
Corner construction matters more than you might expect. Where two border walls meet at a corner, you need overlap. In Layer 1, one wall's bricks should extend to the corner and the perpendicular wall's bricks should butt against them. In Layer 2, reverse that overlap. This interlocking corner construction prevents the border from separating at the corners under lateral stress, which is exactly the kind of force that happens when you slide plates together or pick up a connected layout.
The surface treatment is up to you. Some builders leave the baseplate surface bare as a flat building area. Others tile over it with plates or tiles to create specific textures - gray tiles for pavement, green plates for grass, tan tiles for dirt. For my Pagoda build display base, the MILS plates use dark gray tiles to represent the pavement around the start/finish line. The beauty of the system is that the connection points are in the border, so the entire surface area of the baseplate is yours to customize.
Where MILS really shines is in display flexibility. Consider the IMS Pagoda build. The Pagoda itself sits on a display base. That base is built on MILS-compatible plates. Which means I can expand the display at any time: add another 32×32 plate to extend the paddock area, add a plate with grandstand seating, add a plate with pit lane markings. Each new plate connects mechanically to the existing layout and extends the scene without requiring any modification to the plates already in place.
This is the core value proposition of MILS for home builders: your display is never finished, and it is never locked in. Built a new MOC? Put it on a MILS plate and connect it to the existing layout. Want to rearrange for a different shelf? Disconnect, rearrange, reconnect. Bringing builds to a LEGO User Group meeting? Disconnect individual plates, transport them flat, and reconnect at the venue. The modularity works in every direction.
For builders working on themed collections - a city layout, a Star Wars diorama, a motorsport scene - MILS provides the infrastructure that makes the collection feel like a unified display rather than a shelf of unrelated builds. The connection points ensure consistent height alignment between plates. The standardized border width means no awkward gaps. And because the system is community-standard, you can even connect your plates with builds from other MILS-compatible builders at events.
Here is the exact parts list for one standard 32x32 MILS plate. This specification uses Technic connection points at positions 4, 12, 20, and 28 studs along each edge (4 connection points per side, 16 total). All part numbers are official LEGO element IDs that you can search on BrickLink, Pick a Brick, or BrickOwl.
| Part | Element ID | Name | Qty | Notes |
|---|---|---|---|---|
| Baseplate 32x32 | 3811 | Baseplate 32 x 32 | 1 | Gray (4219690), Green (4219689), or Tan |
| Technic Brick 1x4 | 3701 | Technic Brick 1 x 4 with Holes | 16 | 4 per side, at connection points |
| Brick 1x4 | 3010 | Brick 1 x 4 | 24 | Layer 1 fillers between Technic bricks |
| Brick 1x2 | 3004 | Brick 1 x 2 | 8 | Corner fills and gap adjustments |
| Brick 1x6 | 3009 | Brick 1 x 6 | 16 | Layer 2 cap bricks (offset from L1 joints) |
| Brick 1x4 | 3010 | Brick 1 x 4 | 12 | Layer 2 cap bricks (remaining gaps) |
| Brick 1x2 | 3004 | Brick 1 x 2 | 8 | Layer 2 corner overlaps |
| Technic Pin 1/2 | 4274 | Technic Pin 1/2 (half pin) | 16 | Connection pins (shared between plates) |
Total unique parts: 8 different elements, approximately 101 pieces per plate (including pins).
Bulk order tip: If you plan to build 4 or more plates, order all your Technic bricks and pins in a single BrickLink order. You need 64 Technic Brick 1x4 (3701) and 64 half-pins (4274) for a 4-plate set. Buying in bulk from one seller saves significantly on per-piece cost and shipping. Check our BrickLink guide if you have never ordered from the platform before.
Pin positions diagram (per 32-stud edge):
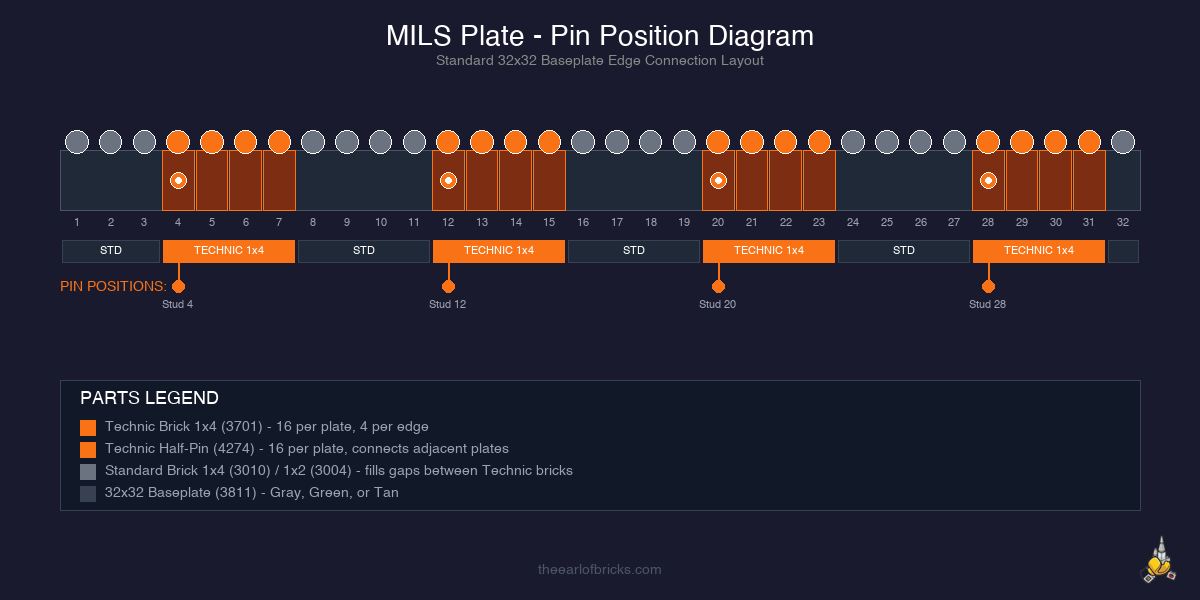
Orange sections = Technic Brick 1x4 (3701) with pin hole. Black dots = where Technic half-pins (4274) insert to connect adjacent plates. Standard bricks fill the gaps between Technic bricks.
The honest reality of MILS is that it adds cost. Every plate requires a 32×32 baseplate (roughly $8, $15 depending on color and source), plus the border bricks, Technic bricks, and Technic pins. For a single MILS plate, the parts cost is modest - maybe $15, $25 total depending on where you source the bricks. But if you are building a display layout with eight or twelve plates, those costs multiply into a meaningful investment in infrastructure that is, by definition, invisible. Nobody looks at your display and admires the baseplate connections. They admire the builds on top.
There are ways to manage cost. Bulk-buying Technic bricks on BrickLink is significantly cheaper per piece than buying them individually. Standard bricks for the border can come from bulk lots - they do not need to be a specific color since the border is usually hidden below the surface build. Gray baseplates are the most common and therefore the cheapest. And if you already have a collection of standard baseplates, you are halfway there already.
MILS plates are infrastructure. You invest in them once, and they serve every build you place on top of them for years. The modularity pays for itself the first time you rearrange a display.
My recommendation for first-time MILS builders: start with four plates. Build them identically. Connect them into a 2×2 grid. Put a build on top. See how it feels to have a connected, unified display base under your MOC. If the modularity clicks for you - if you immediately start thinking about what you would put on the next plate - then you know the system is worth investing in. If a flat display surface is all you need, a single large baseplate without the MILS connection system might be the simpler answer.
Pick one spec and stick with it. There are several variants of the MILS standard floating around the community. Some use different pin spacings, different border heights, or different connection hardware. It does not matter which one you choose, as long as every plate you build uses the same specification. Mixing specs defeats the entire purpose of standardization.
Test the connection before building all your plates. Build two plates. Connect them. Push them, pull them, lift the joined pair. Make sure the connection is firm enough to hold during normal handling but not so tight that separating them requires excessive force. Technic half-pins generally provide a better balance than full-length pins for this application. Adjust your pin type before committing to a full set of plates.
Color-code your border bricks by position. If you are building multiple plates, use a consistent color for the Technic bricks and a different color for the filler bricks. This makes it easy to identify connection points during assembly without having to count studs. The border is hidden in the finished display, so color does not matter aesthetically - use it functionally.
Keep spare pins and extra Technic bricks. Pins are small and easy to lose. Technic bricks crack under stress over time, especially if plates are connected and disconnected frequently. Having spares on hand means a broken connection point does not take a plate out of service. I keep a small parts bag with each display layout specifically for MILS maintenance.
Document your spec. Write down or photograph the exact pin positions, brick types, and border construction you used. When you build more plates six months later, you will not remember the details. A single reference photo of your border construction saves the guesswork. Check the Parts Lab for standardized parts lists as that resource develops.
MILS is not glamorous. It is not the part of LEGO building that anyone gets excited to photograph or display. But it is the infrastructure that makes everything else work better. A great MOC on a MILS plate is a great MOC that can go anywhere, connect to anything, and become part of something larger. That flexibility - the ability to grow your display without starting over - is worth every Technic brick in the border.
Once you have a solid display base, organizing what goes on top matters just as much. The LEGO organization guide covers the storage setup that feeds your display, and the 500+ sets storage breakdown tackles the harder decision of what to keep built versus sorted into the system.